◎ 객체
▼ 객체 지향 프로그램의 대상 , 생성된 인스턴스
◎ 클래스
▼ 객체를 프로그래밍 하기위해 코드로 만든 상태
◎ 인스턴스
▼ 클래스가 메모리에 생성된 상태
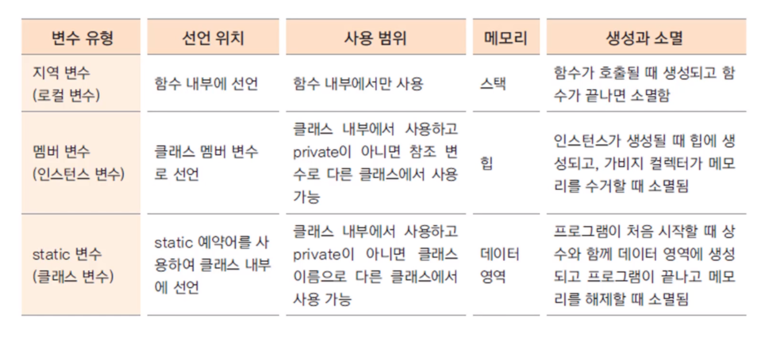
◎ 멤버 변수
▼ 클래스의 속성, 특성
◎ 메서드
▼ 멤버 변수를 이용하여 클래스의 기능을 구현
◎ 참조변수
▼ 메모리에 생성된 인스턴스를 가리키는 변수
◎ 참조 값
▼ 생성된 인스턴스의 메모리 주소값
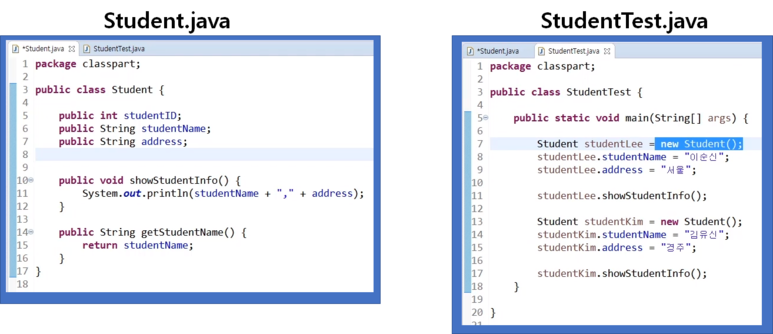
StudentTest.java 에서
Student studentLee = new Student();  // 인스턴스 : 생성과 동시에 자바 heap memory에 할당
//studentLee 는 참조변수이다 student.java의 인스턴스를 참조하고 있기 때문이다.
System.out.println(studentLee);
//이렇게 studentLee 를 출력하면 student.java의 참조값이 출력된다
//(ex: classpart.Student@a23d95)

Student.java 에서
 public int studentID;
 public String studentName;
 public String address;
//위 변수들을 멤버변수라고 한다

 public void showStudentInfo(){
}
//위의 것을 student.java 클래스의 메서드 라고 한다.
◎ Stack
▼ main에 작성한 변수등등 코드들은 stack 에 차례대로 쌓엿다가 제 할 일을 다하면 다시 없어지는 그런 구조이다. 먼저 작성한 변수들이 차례대로 쌓엿다가 젤 나중에 쌓인 애들이 먼저 없어지는 그런....(선입후출)
◎ HeapMemory
▼ JVM (자바 버츄얼 머신)이 가지고있는 가상 메모리이다. 인스턴스들이 쌓이져 주로 NEW 생성자를 사용하면 Heap memory에 쌓인다. 하지만 메서드 들은 heammemory 가 아닌 다른 곳에 있다.
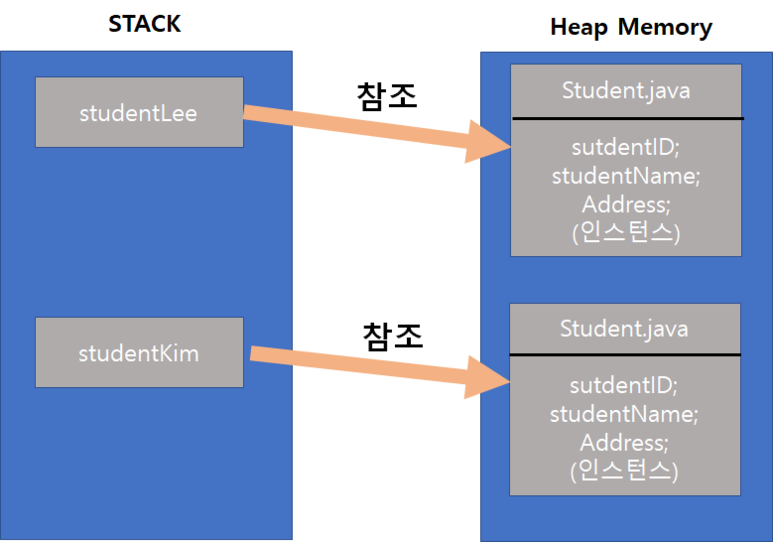
◎ 그림 설명
▼ main 에서 Student studentLee = new student(); 를 하였을경우
student.java의 student 인스턴스가 heap 메모리에 적재되고
studentLee 는 heap 메모리에 적재된 student 인스턴스를 가르키고있는 참조 변수가된다.
하여 student.java의 멤버변수들을 studentLee.studentId 등으로 호출을 할 수 있는것이다.
studentKim 도 똑같다.
◎ 가비지콜렉션
▼ 자바에는 가바지콜렉션이라고 복잡한 알고리즘으로 쌓인 클래스가있는데 이놈이 주기적으로 HEAP MEMORY에 적재된 놈들을 사용하지않으면 다시 메모리를 반환하는 그런 편리한 역할을 한다. 이건 자바의 장점이다 C나 C++에는 없는..
◎ 변수의 생성과 메모리
'프로그래밍 > Java' 카테고리의 다른 글
| [JAVA] 리터럴과 형변환 (0) | 2022.01.04 |
|---|---|
| Java - 라운드 로빈 (Round Robin) 예제 (0) | 2019.05.29 |


